Nội dung chính
Spring Hello World Example
Những công nghệ được sử dụng trong ví dụ
- Spring 4.3.6.RELEASE
- Maven 3
- JDK 1.7
- Eclipse KEPLER SR2
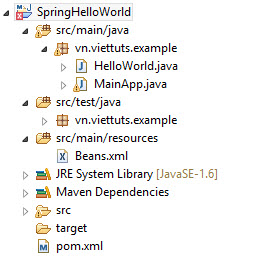
Cấu trúc của project
Bước 1: Cấu hình pom.xml để tải các thư viện cần thiết
<project xmlns="http://maven.apache.org/POM/4.0.0" xmlns:xsi="http://www.w3.org/2001/XMLSchema-instance"
 xsi:schemaLocation="http://maven.apache.org/POM/4.0.0 http://maven.apache.org/xsd/maven-4.0.0.xsd">
 <modelVersion>4.0.0</modelVersion>

 <groupId>vn.tpv</groupId>
 <artifactId>SpringHelloWorld</artifactId>
 <version>0.0.1-SNAPSHOT</version>
 <packaging>jar</packaging>

 <name>SpringHelloWorld</name>
 <url>http://maven.apache.org</url>

 <properties>
  <project.build.sourceEncoding>UTF-8</project.build.sourceEncoding>
 </properties>

 <dependencies>
  <dependency>
   <groupId>junit</groupId>
   <artifactId>junit</artifactId>
   <version>3.8.1</version>
   <scope>test</scope>
  </dependency>
  <!-- https://mvnrepository.com/artifact/org.springframework/spring-core -->
  <dependency>
   <groupId>org.springframework</groupId>
   <artifactId>spring-core</artifactId>
   <version>4.3.6.RELEASE</version>
   <scope>provided</scope>
  </dependency>
  <!-- https://mvnrepository.com/artifact/org.springframework/spring-beans -->
  <dependency>
   <groupId>org.springframework</groupId>
   <artifactId>spring-beans</artifactId>
   <version>4.3.6.RELEASE</version>
  </dependency>
  <!-- https://mvnrepository.com/artifact/org.springframework/spring-context -->
  <dependency>
   <groupId>org.springframework</groupId>
   <artifactId>spring-context</artifactId>
   <version>4.3.6.RELEASE</version>
  </dependency>
 </dependencies>

 <build>
  <pluginManagement>
   <plugins>
    <plugin>
     <groupId>org.apache.maven.plugins</groupId>
     <artifactId>maven-compiler-plugin</artifactId>
     <version>3.2</version>
     <configuration>
      <source>1.6</source>
      <target>1.6</target>
     </configuration>
    </plugin>
   </plugins>
  </pluginManagement>
 </build>
</project>
Step 2: Tạo source file
Chúng ta cần phải tạo các file HelloWorld.java và MainApp.java trong package vn.viettuts.example.
File HelloWorld.java
package vn.viettuts.example;

public class HelloWorld {
 private String message;

 public void setMessage(String message) {
  this.message = message;
 }

 public void getMessage() {
  System.out.println("Your Message : " + message);
 }
}
File MainApp.java
package vn.viettuts.example;

import org.springframework.context.ApplicationContext;
import org.springframework.context.support.ClassPathXmlApplicationContext;

public class MainApp {
 public static void main(String[] args) {
  ApplicationContext context = new ClassPathXmlApplicationContext(
    "Beans.xml");
  HelloWorld obj = (HelloWorld) context.getBean("helloWorld");
  obj.getMessage();
 }
}
Dưới đây là 2 điều quan trong cần chú ý của lớp MainApp.java
- Bước đầu tiên để tạo ngữ cảnh ứng dụng bằng việc sử dụng framework API ClassPathXmlApplicationContext(). API này tải file cấu hình bean và khởi tạo các đối tượng bean được cấu hình trong file.
- Bước hai là sử dụng phương thức getBean() để get thông tin bean được yêu cầu. Phương thức này sử dụng bean ID để trả về đối tượng tương ứng.
Bước 3: tạo file cấu hình Beans.xml
Tạo file resource 'src/main/resources', sau đó tạo file Beans.xml vào resource vừa tạo.
<?xml version="1.0" encoding="UTF-8"?>

<beans xmlns="http://www.springframework.org/schema/beans"
    xmlns:xsi="http://www.w3.org/2001/XMLSchema-instance"
    xsi:schemaLocation="http://www.springframework.org/schema/beans
    http://www.springframework.org/schema/beans/spring-beans-3.0.xsd">

   <bean id="helloWorld" class="vn.viettuts.example.HelloWorld">
       <property name="message" value="Hello World!"/>
   </bean>

</beans>
Bước 4: Run chương trình
Output:
Your Message : Hello World!
Dowload Source Code


